Update: January 10, 2016
With recent changes to proXPN’s setup this guide no longer works. Currently, the proXPN free server is 196.52.21.65 on UDP ports 443, 80, and 8080. With the OpenVPN Connect iOS app, I can connect and authenticate with my free account; however, I cannot ping the route-gateway 192.168.125.1.
Original Post
I’ve been hearing about proXPN on Security Now! and figured I’d give their free (OpenVPN) offering a try. Their free offering limits you to a single VPN server and either 300 kb/s or 600 kb/s of bandwidth (different pages give different restrictions). A VPN is important for protecting unencrypted cookies and other data sent over a coffee shop, hotel network, or other unsecured network.
First of all if you’ve been receiving Transport Error: Transport error on 'd1.proxpn.com': NETWORK_RECV_ERROR errors when trying to import a MacOS or Windows proxpn.ovpn file, simply change your remote server to ios-d2.proxpn.com. As far as I can tell, proXPN has a specific server for iOS OpenVPN clients and their other server disconnects iOS devices resulting in an infinite connect/retry loop.
If you have no idea what I just said, don’t worry, I have two step by step guides. The first is basic; however, it requires you to install an additional app on your phone. The second is advanced and requires editing of config files.
Basic Setup
Get started by going to proXPN and create your account. If you decide to pay for a account, I recommend using offercode SN20 which supports the Security Now! podcast and gives you 20% off.
On your iPhone or iPad, install the OpenVPN Connect and proXPN VPN apps.
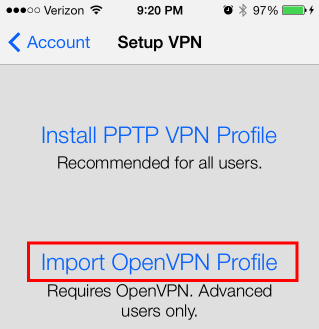 Launch the proXPN VPN app. Enter the email address and password you used when setting up your account with proXPN. Tap “Not now…” when offered to upgrade to Premium. Tap “VPN Setup ->” and then tap “Import OpenVPN Profile”.
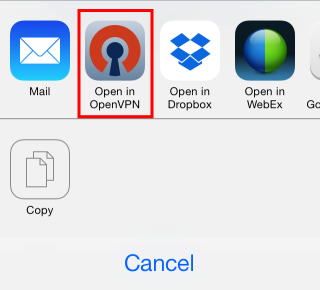 Tap “Open in OpenVPN”.
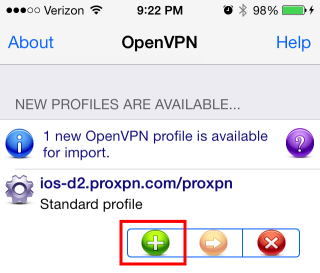 Wait for OpenVPN Connect to open (this takes a few seconds). Tap the green plus to import the configuration.
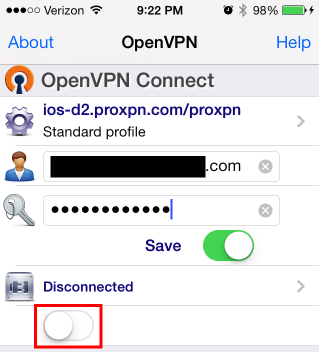 Enter your username and password, move the ‘Save’ slider (if you don’t want to re-enter your password each time), and tap the slider under ‘Disconnected’.
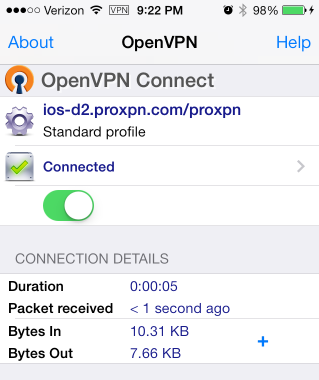 Your traffic is now protected by a VPN. OpenVPN says ‘Connected’ and ‘VPN’ appears in the status bar next to the network signal strength. Tap the slider under ‘Connected’ to disconnect.
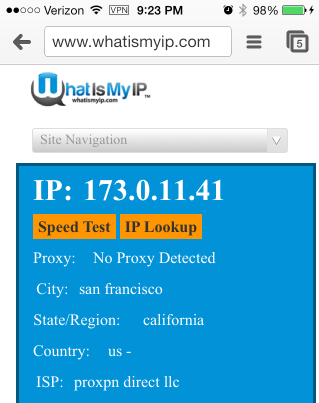 You can verify that your traffic is being sent through the VPN by opening your browser (Safari, Chrome, etc.) and going to www.whatismyip.com before and after connection to the VPN. whatismyip.com will report a different physical location and internet service provider (ISP).
Advanced Setup
Get started by going to proXPN and create your account. If you decide to pay for a account, I recommend using offercode SN20 which supports the Security Now! podcast and gives you 20% off.
On your iPhone, install the OpenVPN Connect app.
Download the Windows Installer or Mac Installer (the downloads start automatically when going to these pages). Install the proXPN desktop client. If you don’t wan to install the desktop client, I’ve heard it’s possible to extract the necessary config file from the source here; however, I haven’t tried this.
With the desktop clients, the config files can be found at:
- (Windows) C:\Program Files (x86)\proXPN\config\
- ProXPN.ovpn
- ssl\ca.crt
- ssl\client.crt
- ssl\client.key
- (MacOS after running proXPN) ~/Library/Application Support/proXPN/Configurations/
- proxpn.ovpn
- ssl/ca.crt
- ssl/client.crt
- ssl/client.key
- (MacOS ‘Show Package Contents’) [proXPN Location]/proXPN.app/Contents/Resources/
- proxpn.ovpn
- ca.crt
- client.crt
- client.key
Open all of the config files in a text editor (I like Notepad++ for Windows and TextWrangerl for MacOS).
In the proxpn.ovpn file, make the following additions:
- Add a line with
remote ios-d2.proxpn.com 443. If you want to follow convention, add this after the prot tcp line.
- Delete or comment out the
ca ssl/ca.crt, cert ssl/client.crt, key ssl/client.key.
- At the end of the file add:
<ca>
[ENTIRE CONTENTS OF ca.crt]
</ca>
- At the end of the file add:
<cert>
[ENTIRE CONTENTS OF client.crt]
</cert>
- At the end of the file add:
<key>
[ENTIRE CONTENTS OF client.key]
</key>
Load the proxpn.ovpn file on your iOS device and open it in the OpenVPN Connect app. You can load the file through iTunes and sending it directly to the app or transfer it using another means (e.g. email, DropBox). Open the OpenVPN Connect app, tap the green plus to import the profile, enter your credentials, and tap the slider below ‘Disconnect’. Your VPN is now configured and active.
